Add favorite programs to the top of Windows 10’s Start Menu
The following guide explains how you can stick your favorite programs and applications to the top of the program listing in the Windows 10 start menu.
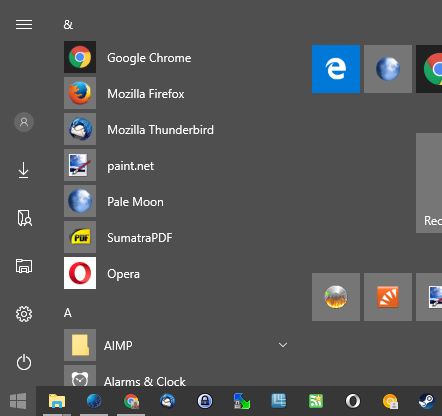
Microsoft's Anniversary Update, released on August 2, 2016 shipped with a number of changes. A start menu redesign was one of the changes. Microsoft moved the shutdown button to the bottom position for instance, and decided to display all installed application shortcuts directly on the first page of the start menu.
The program listing is sorted alphabetically, which means that apps may be listed at the top that you barely ever use. The first app on default installations is 3D Builder for instance followed by Alarms and Clocks, the Calculator and other applications that come pre-installed with Windows 10.
While you may place favorite programs on the right of the listing for quick access, Windows 10 ships with surprising little options to modify the full list of programs.
In fact, there is no option to hide entries from the listing. You may remove apps or uninstall programs, but may only want to do so for programs and apps that you don't use.
Add favorite programs to the top of Windows 10's Start Menu
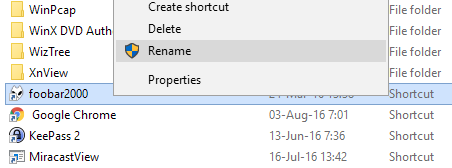
The whole process is rather easy to carry out. First thing you need to do is open the folder that contains the entries listed in the start menu.
Visit C:\ProgramData\Microsoft\Windows\Start Menu\Programs on your computer for that. You will notice folders and shortcuts listed there. The method works for files and folders listed there.
Now, do the following to stick a program to the very top of the listing:
Step 1: Right-click on the shortcut name and select Rename from the context menu.
Step 2: Move the cursor to the beginning of the shortcut name.
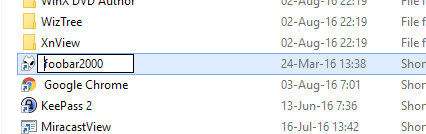
Step 3: Hold down the Alt-key on the keyboard, and tap on the following keys one after the other on the numpad: +0160. This should add a space in front of the shortcut name. Press Enter, and confirm the UAC prompt that appears to complete the process.
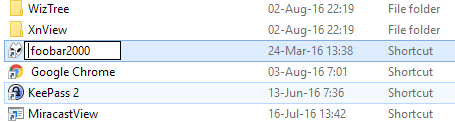
Step 4: Repeat the process for any file or shortcut that you want displayed at the Very top of the windows 10 Start Menu.
Note: It may take a moment before the changes become visible when you open the start menu. Windows picks the change up automatically though which means you don't have to restart before the listing changes.
If your favorite program is not listed, simply create a shortcut for it and place it in the same folder. Then follow the steps outlined above to get it to display at the top of the start menu.
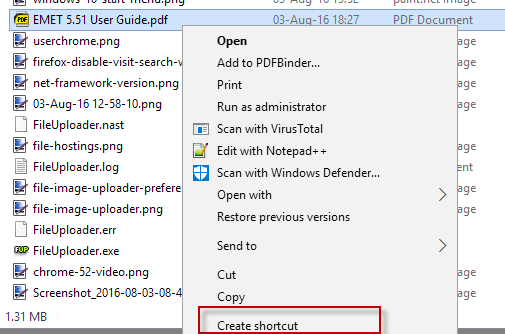
You create shortcuts of programs with a right-click on them and selecting the "create shortcut" option from the context menu.
This article was first seen on ComTek's "TekBits" Technology News

- Log in to post comments